Tech Hacks 10 Practical Tips No Special Tools

10 Simple Household Tech Hacks That Actually Work

Practical, tested fixes for the appliances and systems you rely on every day. Each hack takes under 30 minutes and uses items you already own. Updated May 2026.

Most household appliance problems do not require a technician, a specialist cleaning product, or a replacement part. They require the right information and ten minutes of your time. We have compiled the ten most impactful hacks our editorial team has tested — each one using items found in any Japanese household.

Descaling a drip coffee maker with white vinegar and water — the simplest and most effective method

Hack #1

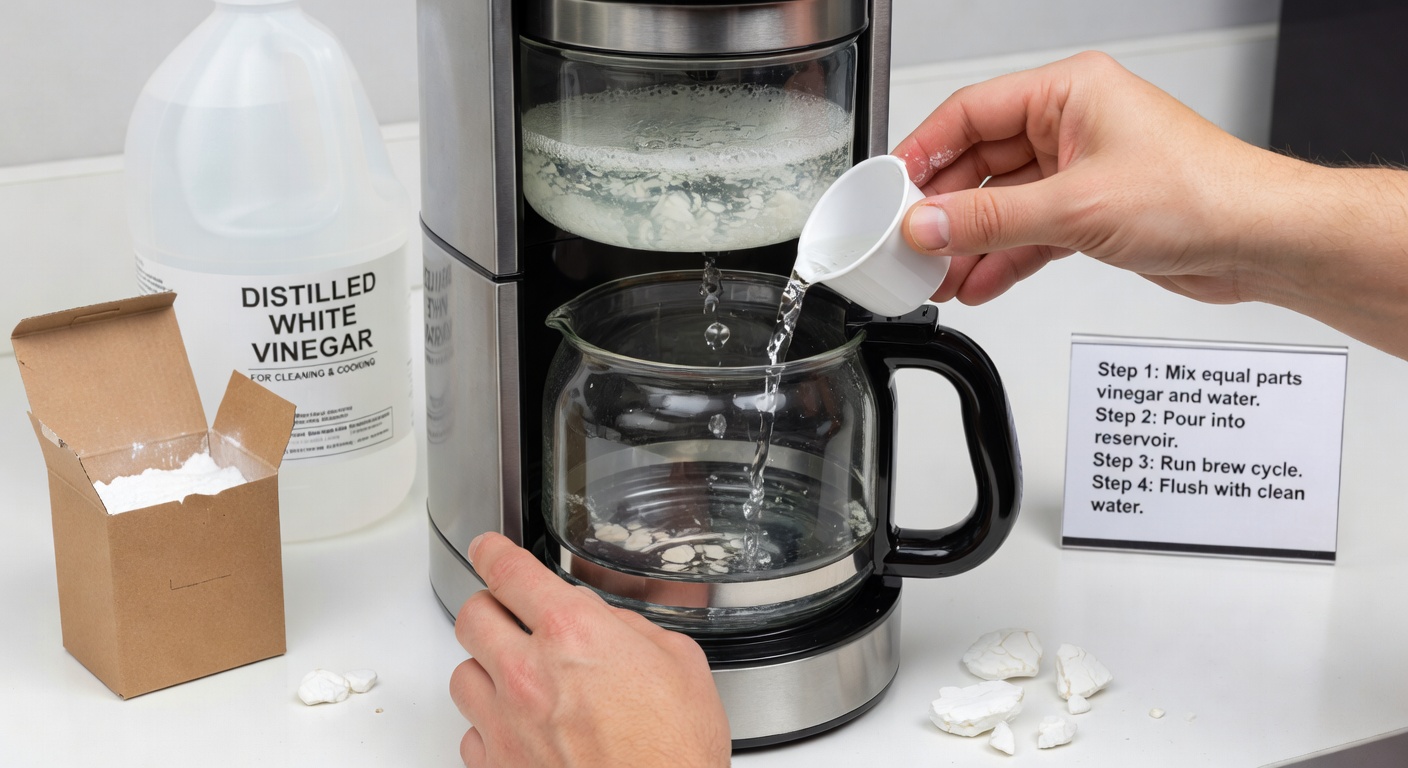
Descale Your Coffee Maker with White Vinegar

Mineral scale builds up inside coffee makers faster than almost any other kitchen appliance because water passes through the heating element repeatedly, leaving dissolved calcium and magnesium compounds behind each time. Scale insulates the heating element, forcing it to work harder to reach temperature, increasing electricity consumption, and eventually causing it to fail prematurely.

What you need: White rice vinegar (米酢 or 白酢), water, and your coffee maker's carafe.

How to do it: Fill the water reservoir with a 50:50 mixture of white vinegar and cold water. Place the empty carafe on the warming plate and run a full brew cycle without any coffee grounds or filter. Once the cycle is complete, discard the vinegar-water mixture and refill the reservoir with fresh cold water only. Run two complete brew cycles with plain water to thoroughly rinse any vinegar taste from the machine's internal tubing. Allow to cool and dry before making your next cup.

How often: Every 4–6 weeks in areas with hard water (much of Tokyo's water supply is moderately hard); every 8–10 weeks in softer water areas.

Result: Faster brew times, hotter coffee at the cup, and a machine that lasts significantly longer before requiring expensive element replacement.

💻

Hack #2

Reset a Frozen Smart Device Without Losing Settings

Smart home devices — thermostats, robot vacuum controllers, smart doorbells — occasionally freeze or become unresponsive. The instinctive response is a factory reset, which wipes all your settings. Before you do that, try a power cycle combined with a cache flush.

How to do it: Disconnect the device from power (remove plug or batteries). Wait a full 60 seconds — not 10, not 30, but a full minute. This allows capacitors to fully discharge and the device's volatile memory to clear completely. Reconnect power and wait for the full boot sequence to complete before testing. In approximately 70% of cases, this resolves frozen or unresponsive smart devices without losing any configuration.

For devices with a physical reset button that triggers only a soft reset (not factory reset), pressing and releasing it during the boot sequence can additionally clear the application layer cache without affecting stored settings.

Cleaning refrigerator condenser coils at the back or base of the refrigerator with a vacuum and brush

Hack #3

Clean Refrigerator Coils to Cut Energy Bills

The condenser coils of a refrigerator — located either at the back of the machine or behind a grille at the base — are responsible for releasing heat extracted from inside the refrigerator into the room air. When these coils become coated in dust and pet hair (which happens faster than you might imagine), their ability to transfer heat is dramatically reduced. The compressor must then run for longer periods to maintain the target temperature, increasing electricity consumption by 15–30%.

What you need: A vacuum cleaner with a narrow attachment, a long-handled soft brush (a dryer vent brush or dedicated coil brush works perfectly), and a torch.

How to do it: Pull the refrigerator away from the wall slightly (or remove the lower front grille). Shine a torch at the coil area to assess the level of dust accumulation. Use the soft brush to gently dislodge dust from the coil fins — work from top to bottom so debris falls to the floor. Then use the vacuum with the narrow attachment to remove the dislodged dust. Reposition the refrigerator, ensuring a minimum 5cm gap between the coils and the wall for air circulation.

How often: Every 6–12 months. More frequently in households with pets.

Result: Lower electricity bills, quieter compressor operation, and a refrigerator that maintains consistent temperatures more reliably.

Hack #4

Restore a Slow Wi-Fi Router in 3 Minutes

Wi-Fi routers run continuously for months or years without being restarted. Over time, the router's memory fills with connection logs, ARP tables, and cached data that degrade performance. A systematic restart — rather than a simple power-off — clears this accumulated data far more effectively.

How to do it: Log into your router's admin panel (typically 192.168.1.1 or 192.168.0.1 in a browser). Navigate to the System or Administration section and choose "Restart" or "Reboot" — do not choose "Reset to Factory Defaults". If you cannot access the admin panel, a physical power cycle of 60 seconds achieves a similar result. After restart, wait 3 minutes for all interfaces to re-initialise before testing your connection speed.

Additionally, log into the router settings and check whether the 2.4GHz and 5GHz channels are set to "Auto" — on auto, the router selects the least congested channel at startup. If you live in a dense apartment building, manually setting a specific channel (1, 6, or 11 for 2.4GHz; a non-overlapping channel for 5GHz) can dramatically improve stability.

💡

Hack #5

Fix a Flickering LED Light Without Replacing the Bulb

LED light flickering is almost never caused by a faulty bulb. It is nearly always caused by incompatible dimmer switches, loose wiring at the fixture, or a failing LED driver circuit. Before buying replacement bulbs, check these causes first.

Dimmer incompatibility: Most standard dimmer switches were designed for incandescent bulbs, which have very different electrical characteristics to LEDs. Check whether your bulb is labelled "Dimmable LED" — non-dimmable LEDs will always flicker on a dimmer switch. If the bulb is dimmable but still flickers, look for a minimum load specification on the dimmer switch packaging — LED bulbs often draw too little power to trigger the switch properly. Replace the dimmer with an LED-compatible model.

Loose connection: Switch off the circuit breaker for the affected light. Remove the bulb and use a non-contact voltage tester to confirm the circuit is dead. Then check that the bulb is fully and firmly seated in the socket. On bayonet fittings, turn slightly further clockwise than feels natural — they often flicker due to being partially unseated.

Advertisement — 728 × 90

Advertising supports our free editorial guides.

Hack #6

Restore a Dishwasher to Full Performance with One Step

If your dishwasher is leaving dishes dirty, spotted with residue, or producing a foul odour, the most likely cause is a blocked spray arm — not a failing pump or motor. Each spray arm has small holes (nozzles) through which pressurised water jets onto the dishes. Limescale, detergent residue, and food particles gradually block these nozzles, reducing water coverage and cleaning effectiveness.

How to do it: Pull out the lower basket and locate the spray arm (usually a flat cross- or star-shaped plastic piece that spins freely when spun by hand). On most machines it unclips by pressing a central cap or unscrewing a central nut. Remove it and hold it under running water. Use a toothpick to clear each individual nozzle hole — push straight through from the jet side. Soak the spray arm in warm vinegar water for 10 minutes if scale is heavy. Rinse, reinstall, and run a hot cycle.

Repeat for the upper spray arm if your machine has one. This single procedure restores cleaning performance in the vast majority of cases reported by readers.

Hack #7

Make Your Air Conditioner Work 20% Harder (Instantly)

An air conditioner's efficiency drops precipitously when its filter is dirty. The filter sits behind the front panel grille and traps airborne particles — within 4–6 weeks of use, a fine layer of dust can cover the entire filter surface, forcing the unit to work significantly harder to pull the same volume of air through.

How to do it: Switch off the air conditioner and wait 5 minutes. Open the front panel (it typically hinges up from the bottom on most Japanese split-type units). Slide out the mesh filter — it usually pulls directly forward after being unclipped. Take it to the sink and rinse under cool running water from the clean side to the dirty side. For heavy dust build-up, a soft brush and a small amount of neutral dish soap will help. Rinse thoroughly, shake off excess water, and allow to dry for 20–30 minutes before reinstalling. Do not use the unit until the filter is completely dry.

Clean air conditioner filters every 2 weeks during heavy summer use, and every 4 weeks during light use seasons.

🔊

Hack #8

Silence a Noisy Extractor Fan in 10 Minutes

Kitchen and bathroom extractor fans become progressively noisier as they accumulate grease and dust on their fan blades. A rattling, grinding, or loud humming fan is almost never broken — it is almost always dirty and in need of a clean.

How to do it: Turn off the power to the fan at the circuit breaker (not just the wall switch, which on some installations does not fully isolate the motor). Remove the cover grille — most clip off with a gentle pull or by pressing tabs on each side. Wipe the grille under warm water with dish soap to remove grease build-up. The fan blade assembly will be visible inside — wipe each blade with a damp cloth or kitchen roll soaked in diluted dish soap to remove grease and dust. Dry thoroughly before replacing the grille and restoring power.

If the fan remains noisy after cleaning, the bearings in the motor may be worn. Applying a small drop of light machine oil to the bearing spindle (accessible after removing the blade assembly on most units) can restore quiet operation for another year or two.

🔢

Hack #9

Prevent Phone Charger Cable Breaks at the Root

The failure point of almost every USB cable is the first 3–5cm from the connector — this is where the cable flexes repeatedly as it is plugged in and moved around, causing the internal copper strands to fatigue and break. The fix costs nothing if you have an old ballpoint pen at home.

How to do it: Remove the spring from an old ballpoint pen (just unscrew the barrel and pull it out — the type with a retractable point works best). Slide the spring over the cable end, up against the connector. The spring's natural shape provides graduated flex support along the vulnerable zone — the tight end at the connector transitions to wider coils further along the cable, replicating the stress relief design found on professional-grade cables.

For cables you already use and want to protect without removing the connector end, carefully wrap the stress zone in a tight spiral of clear adhesive tape (starting closest to the connector and overlapping each wrap by 50%), building up 4–6 layers. While less elegant than the spring method, this significantly extends cable life by distributing flex stress over a longer section.

Hack #10

Cut Standby Power Consumption by 30% Overnight

Modern households have dozens of devices consuming power in standby mode: televisions, cable boxes, gaming consoles, desktop computers, audio equipment, and kitchen appliances all draw between 1–25 watts each even when "off." This standby consumption can account for 10–15% of a household's total electricity bill.

How to do it: Install smart power strips on your entertainment centre and home office setups. These strips detect when the primary device (television or computer monitor) is switched off and automatically cut power to all secondary devices (soundbars, console, external drives). This eliminates standby draw from all secondary devices without requiring you to switch anything off manually.

For single devices, individually switched multi-socket extension leads allow you to cut power to devices that are not in use without physically unplugging them. The habit of switching off extension leads before bed is one of the lowest-effort, highest-impact energy saving changes available to any household.

Use a plug-in energy monitor (available at most home centres for 1,500–3,000 yen) to identify which individual devices in your home are the worst standby offenders, then prioritise switching those off first.

Related Articles